
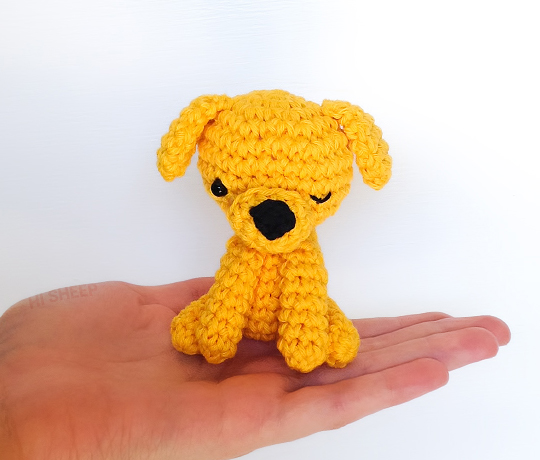
The star of the show! Make your own Lucky the dog from Hawkeye series, to do so we'll use DK yarn in yellow 20 gr, a very small amount of black, a little bit of black emboridery floss, crochet hook 3 mm and one 6 mm safety eye.
The finished doll will be 8 cm / 3,1 inches tall.
The finished doll will be 8 cm / 3,1 inches tall.
ABBREVIATIONS (U.S.):
R: Round
R: Round
mr: magic ring
ch: chain
sc: single crochet
sc: single crochet
BODY:
With yellow.
R1: 6 sc in mr
R2: *sc inc* [12]
R3: *1 sc, sc inc* [18]
R4-6: 18 sc [18]
R7: *7 sc, sc dec* [16]
R8: 16 sc [16]
R9: *6 sc, sc dec* [14]
R10: 14 sc [14]
Break yarn leaving enough for sewing.
With yellow.
R1: 6 sc in mr
R2: *sc inc* [12]
R3: *1 sc, sc inc* [18]
R4-6: 18 sc [18]
R7: *7 sc, sc dec* [16]
R8: 16 sc [16]
R9: *6 sc, sc dec* [14]
R10: 14 sc [14]
Break yarn leaving enough for sewing.

ARMS:
Make two.
With yellow.
R1: 7 sc in mr
R2-7: 7 sc [7]
R8: sc dec, 5 sc [6]
Break yarn leaving enough for sewing.
Sew arms on what is going to be the front of the body between R9-10.
Make two.
With yellow.
R1: 7 sc in mr
R2-7: 7 sc [7]
R8: sc dec, 5 sc [6]
Break yarn leaving enough for sewing.
Sew arms on what is going to be the front of the body between R9-10.

LEGS:
Make two.
With yellow.
R1: 7 sc in mr
R2-5: 7 sc [7]
R6: sc dec, 5 sc [6]
Break yarn leaving enough for sewing.
Sew legs at the sides of the body between R3-5.
Make two.
With yellow.
R1: 7 sc in mr
R2-5: 7 sc [7]
R6: sc dec, 5 sc [6]
Break yarn leaving enough for sewing.
Sew legs at the sides of the body between R3-5.

TAIL:
With yellow.
R1: 6 sc in mr
R2-5: 6 sc [6]
Break yarn leaving enough for sewing.
Sew the tail to the back side of the body between R2-4.
With yellow.
R1: 6 sc in mr
R2-5: 6 sc [6]
Break yarn leaving enough for sewing.
Sew the tail to the back side of the body between R2-4.

HEAD:
With yellow.
R1: 6 sc in mr
R2: *sc inc* [12]
R3: *1 sc, sc inc* [18]
R4: *2 sc, sc inc* [24]
R5: *3 sc, sc inc* [30]
R6-8: 30 sc [30]
R9: *3 sc, sc dec* [24]
The eyes will be between R7-8, place one safety eye and with the embroidery floss make a small curve about 6 stitches apart.
R10: *2 sc, sc dec* [18]
R11: *1 sc, sc dec* [12]
R12: *sc dec* [6]
Close.

SNOUT:
With yellow.
R1: 6 sc in mr
R2: *sc inc* [12]
R3: 12 sc [12]
Break yarn leaving enough for sewing.
With yellow.
R1: 6 sc in mr
R2: *sc inc* [12]
R3: 12 sc [12]
Break yarn leaving enough for sewing.

NOSE:
With black.
2 ch
R1: 2 sc in same ch [2]
Break yarn leaving enough for sewing.
Sew on the nose to the snout.
Sew the snout to the head between R7-10.
With black.
2 ch
R1: 2 sc in same ch [2]
Break yarn leaving enough for sewing.
Sew on the nose to the snout.
Sew the snout to the head between R7-10.


EARS:
Make two.
R1: 4 sc in mr
R2: *sc inc* [8]
R3: *3 sc, sc inc* [10]
R4: 10 sc [10]
R5: *3 sc, sc dec* [8]
R6: *2 sc, sc dec* [6]
1 ch, turn, flatten the piece and close it up with 3 sc
Break yarn leaving enough for sewing.
Sew the ears to the head between R3-4.
Sew the head to the body.
Make two.
R1: 4 sc in mr
R2: *sc inc* [8]
R3: *3 sc, sc inc* [10]
R4: 10 sc [10]
R5: *3 sc, sc dec* [8]
R6: *2 sc, sc dec* [6]
1 ch, turn, flatten the piece and close it up with 3 sc
Break yarn leaving enough for sewing.
Sew the ears to the head between R3-4.
Sew the head to the body.


Best friends:
Clint Barton - Hawkeye
Kate Bishop 2 hairstyles - Hawkeye

Join me:
Instagram https://www.instagram.com/hisheepok
Pinterest https://pinterest.com/hisheepok
If you have any questions or thoughts do not hesitate to leave a comment.
This pattern is for personal use only. Please do not post this pattern to your website or blog, instead post a link to http://hisheepok.blogspot.com/2021/12/lucky-dog.html
If you post a photo of the amigurumi made with this pattern in the web I would appreciate it if you tag me, I'm @hisheepok, use the hashtag #hisheepok or put a link to my blog.
You didn’t specify what parts to stuff? Do I stuff the limbs??
ReplyDeleteHi! I did not feel the need to stuff the limbs since they felt pretty "solid" but this could vary depending on the tension of the work so if your work feels kind of light like it doesn't hold its shape you can stuff them just a bit.
DeleteWhat are the measurements for the finished product?
ReplyDeleteThe finished doll will be 8 cm / 3,1 inches tall.
DeleteHi, what size hook did you use?
ReplyDeleteHello! I used a 3 mm hook
Delete